Case Study III: Scent Memories
 scent dispenser and Mint Digitals [design process](http://foundry2011.mintdigital.com/post/11390517430/the-quest-to-make-the-perfect-smells)](../assets/scent-dispense.png)
Ollyfactory scent dispenser and Mint Digitals design process
Table of contents
- You will need:
- About Transistors
- Wiring your Circuit:
- Building Form
- Code
- Connectivity
- References and Precedents
In this case study, we’ll explore how a couple of simple components can be used to create a powerful cue to memory - scent. We’ll built a simple scent dispenser that can be triggered from any internet connected action e.g. when your friend posts a new tweet or instagram, etc.
You will need:
Hardware
- Particle Photon Microcontroller
- Breadboard
- Jumper Wires
- 2 x TIP120 Transistors
- 2 x 200 Ohm Resistor
- 2 x Diodes
- DC Barrel Jack
- 5V external power supply
- 5V DC Brushless Motor Fan e.g. https://www.sparkfun.com/products/retired/9649
- 5V Heating Pad - 5x15cm e.g https://www.sparkfun.com/products/11289
Software
- Particle Dev or Particle Build
Libraries
- None
About Transistors
Motors (especially high powered ones) can draw a lot of current quickly. It’s not a good idea to have them directly connected to the pins on your board or you can blow the pin or the board itself. This means we’ll need another power source other than the board to get the needed current to our bigger motors. This is where transistors come in. They’re a middleman. And allow us to use them almost as an electrical switch from another circuit.
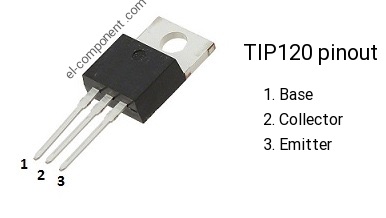
TIP 120 terminals
I generally recommend the TIP120 which is a good multipurpose transistor that works well for most scenarios and circumstances: They can switch up to 60V at peak currents of 8A (not continuously, just peak!) and continuous current of 5A, with a DC gain of about 1000. (see: https://www.adafruit.com/product/976)
When wiring a TIP120 transistor:
- Base - Activates the Transistor. Connected to the Photon
- Collector - Closest to the positive lead of the motor or component you want to supply power to
- Emitter - Closest to the negative lead of the motor or component you want to supply power to
When working with motors, it’s generally good to add a diode between the ground and power of the motor. Diodes only allow electricity to flow in one direction. When you turn the power off to a motor, you get a negative spike of voltage, that can damage your Particle or the transistor. The diode protects against this, by shorting out any such reverse current from the motor. Note the line on the diode. The line should always be closed to the collector.
To find out more about transistors: https://learn.sparkfun.com/tutorials/transistors
Wiring your Circuit:
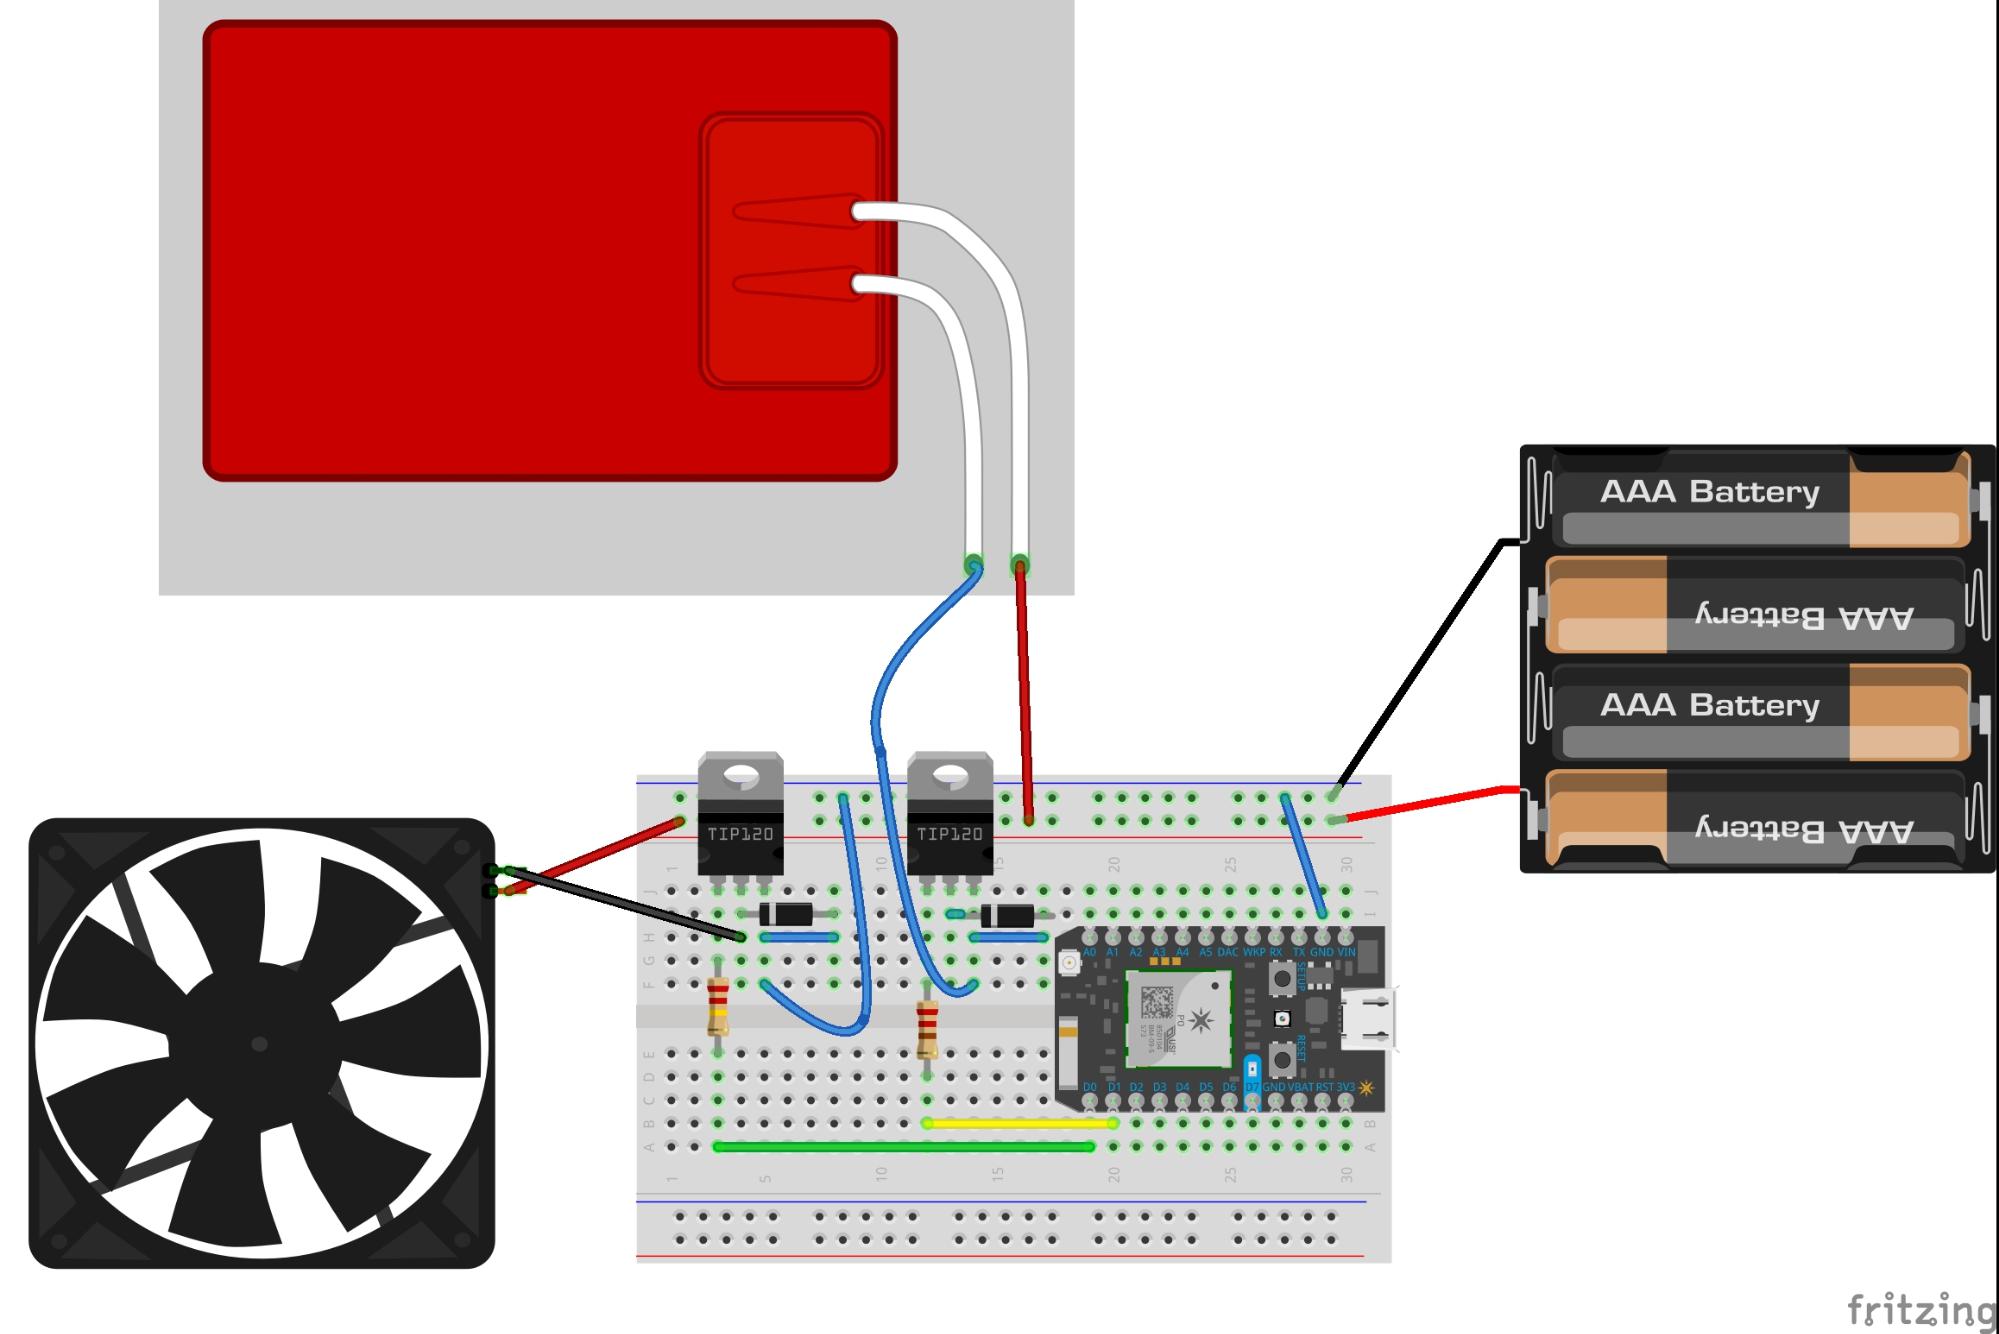
Wiring Diagram
Important Note: When wiring a circuit with external power you shouldn’t have your photon powered or the external power plugged in or switched on. Power down everything before wiring your circuit.
Your circuit should look like the above.
First run a connection from the external power along the upper power rail on your breadboard. Make a connection from ground on your photon to ground on the power rail too.
For the DC Fan
- Add a TIP120 to your board, as depicted.
- To the Base (left most terminal): Connect a 200 ohm resistor and run that connection to D0 on your Photon
- To the Collector (middle terminal): connect the negative lead of the DC fan
- To the Emitter (right terminal): run a connection to ground.
- Bridge the collector and the emitter with a diode (where the diodes’ line should be closest to / facing the collector (middlepin).
For the heating pack
- Do the same except, wire the Base to pin D1 on your photon.
Building Form
The Scent Dispenser project comes with a laser cut form template.
-
The top of the enclosure has some holes to allow the scent to be released.
-
Below that the fan is placed. When the fan spins it’ll help shoot the smell out of the top.
-
Below that is the scent chamber. This is where you’ll place the heating pad. The heating pad will warm the oil or scent to help it vaporise and release.
-
Below that is a small chamber to house your photon and components if you want a neat assembly!
Code
Code for this project can be found here
The code create a cloud-connected method on your microcontroller. When this method is called, it will trigger the heating plate to warm and the fan to start for a short while.
To test triggering this code, visit the Particle console (http://console.particle.io), navigate to the list of devices and select the device you’ve deployed this code to. You’ll see a Cloud Function named scent and a button beside it. Press the button and your scent should deploy.
void setup()
{
  ...
  Particle.function( "scent", handleDispenseScent );
  ...
}

int handleDispenseScent( String command ){
  shouldDispense = true;
  startTime = millis();
  return 1;

}
Connectivity
A quick way to connect the scent to digital actions is with IFTTT. Use the Particle channel to create triggers based on your Google calendar, when you get a new email from a friend, or when someone tweets from your favourite venue and lots lots more.
Learn more about IFTTT and what’s possible in their platform introduction document or browse the list of channels (https://ifttt.com/services) i.e. services they support integrations with
References and Precedents
- http://www.aisencaro.com/scent.html
- https://makezine.com/2012/04/24/my-tv-stinks/
- https://www.hackster.io/trinity-glitch-ba8c06/lis-smart-aroma-diffuser-c96d58
- http://getitmade.com.au/Smart-Fragrance-Dispenser
- http://www.instructables.com/id/Synesthesia-Mask/
- https://smellofdata.com
- http://blog.benturner.com/2011/11/04/physical-computing-group-project-your-tweet-has-been-scent/
- https://hackaday.com/2017/05/11/translate-color-to-smell-with-bouquet/