Working with RFID
Table of contents
- Benefits
- Limitations
- Before you Begin
- Working with the RC552
- Wiring on a Photon or Duo
- Flashing the Code
- Learn More
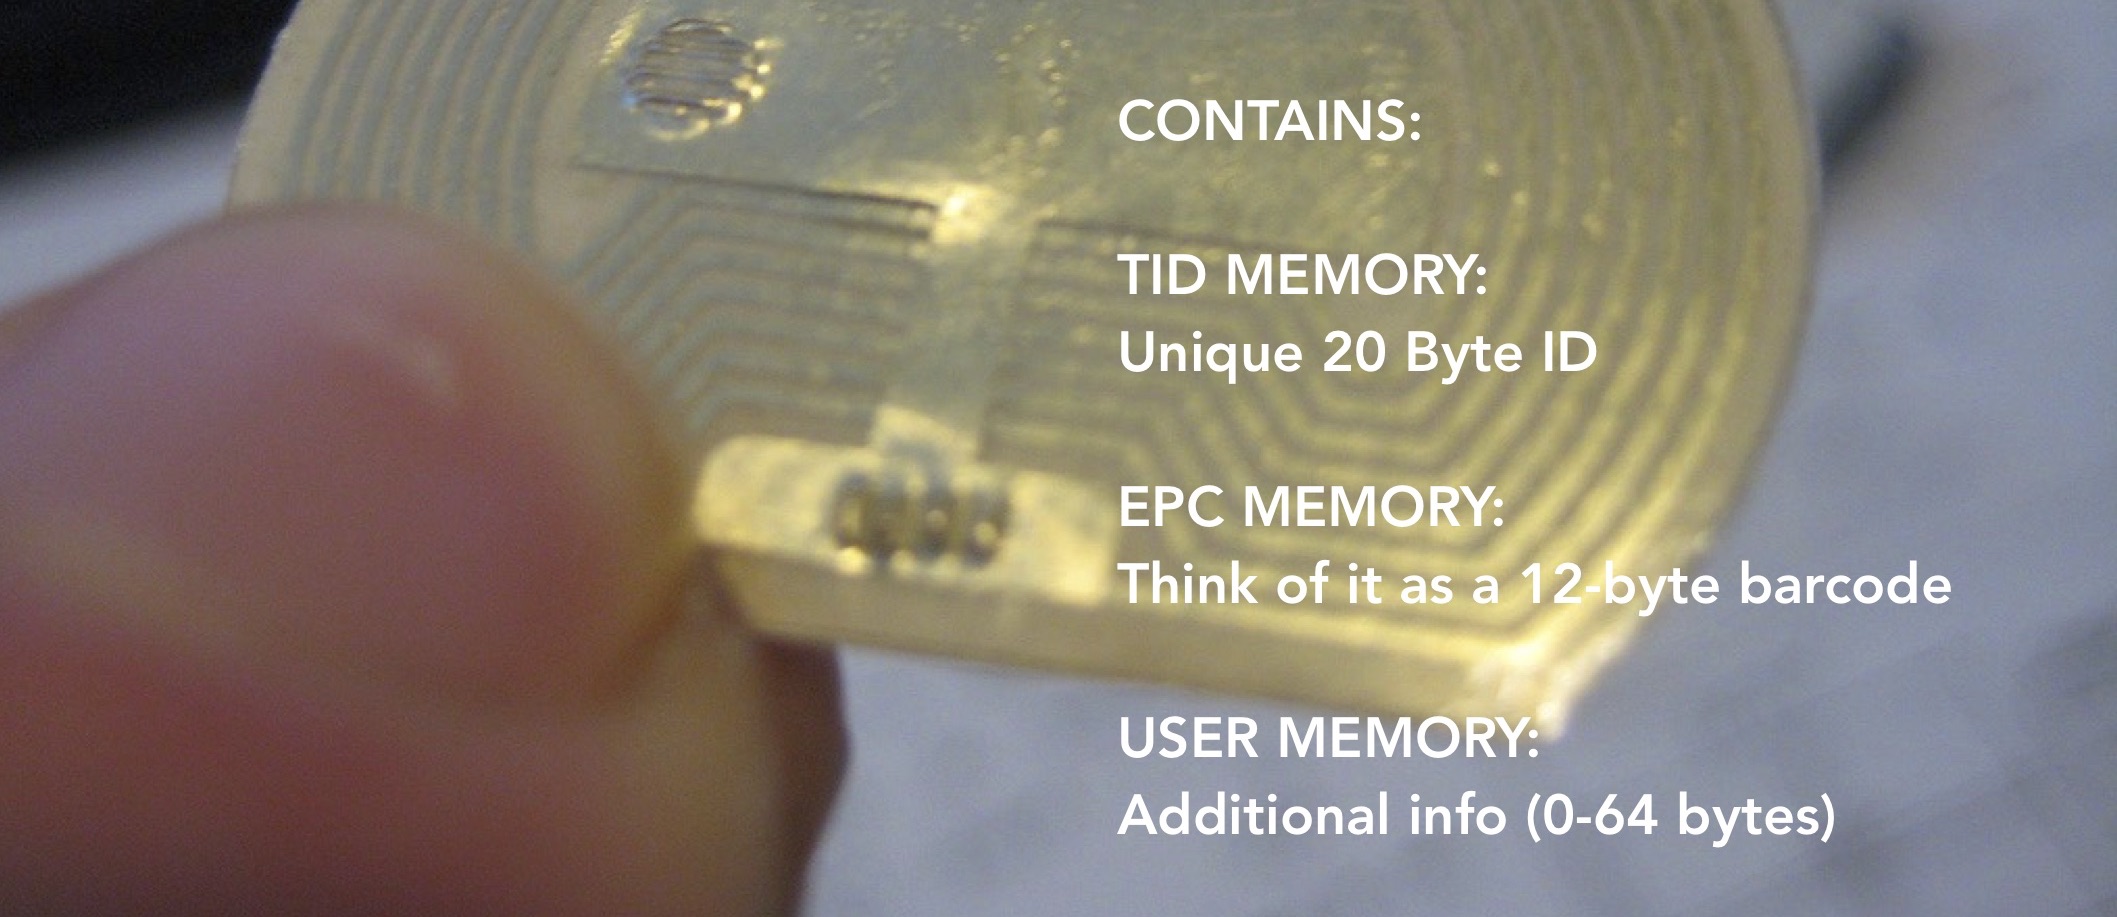
RFID is the basic of smart object. You have a reader and a tag. Each tag has a unique ID that can identify the object as well as some storage space to hold customizable information
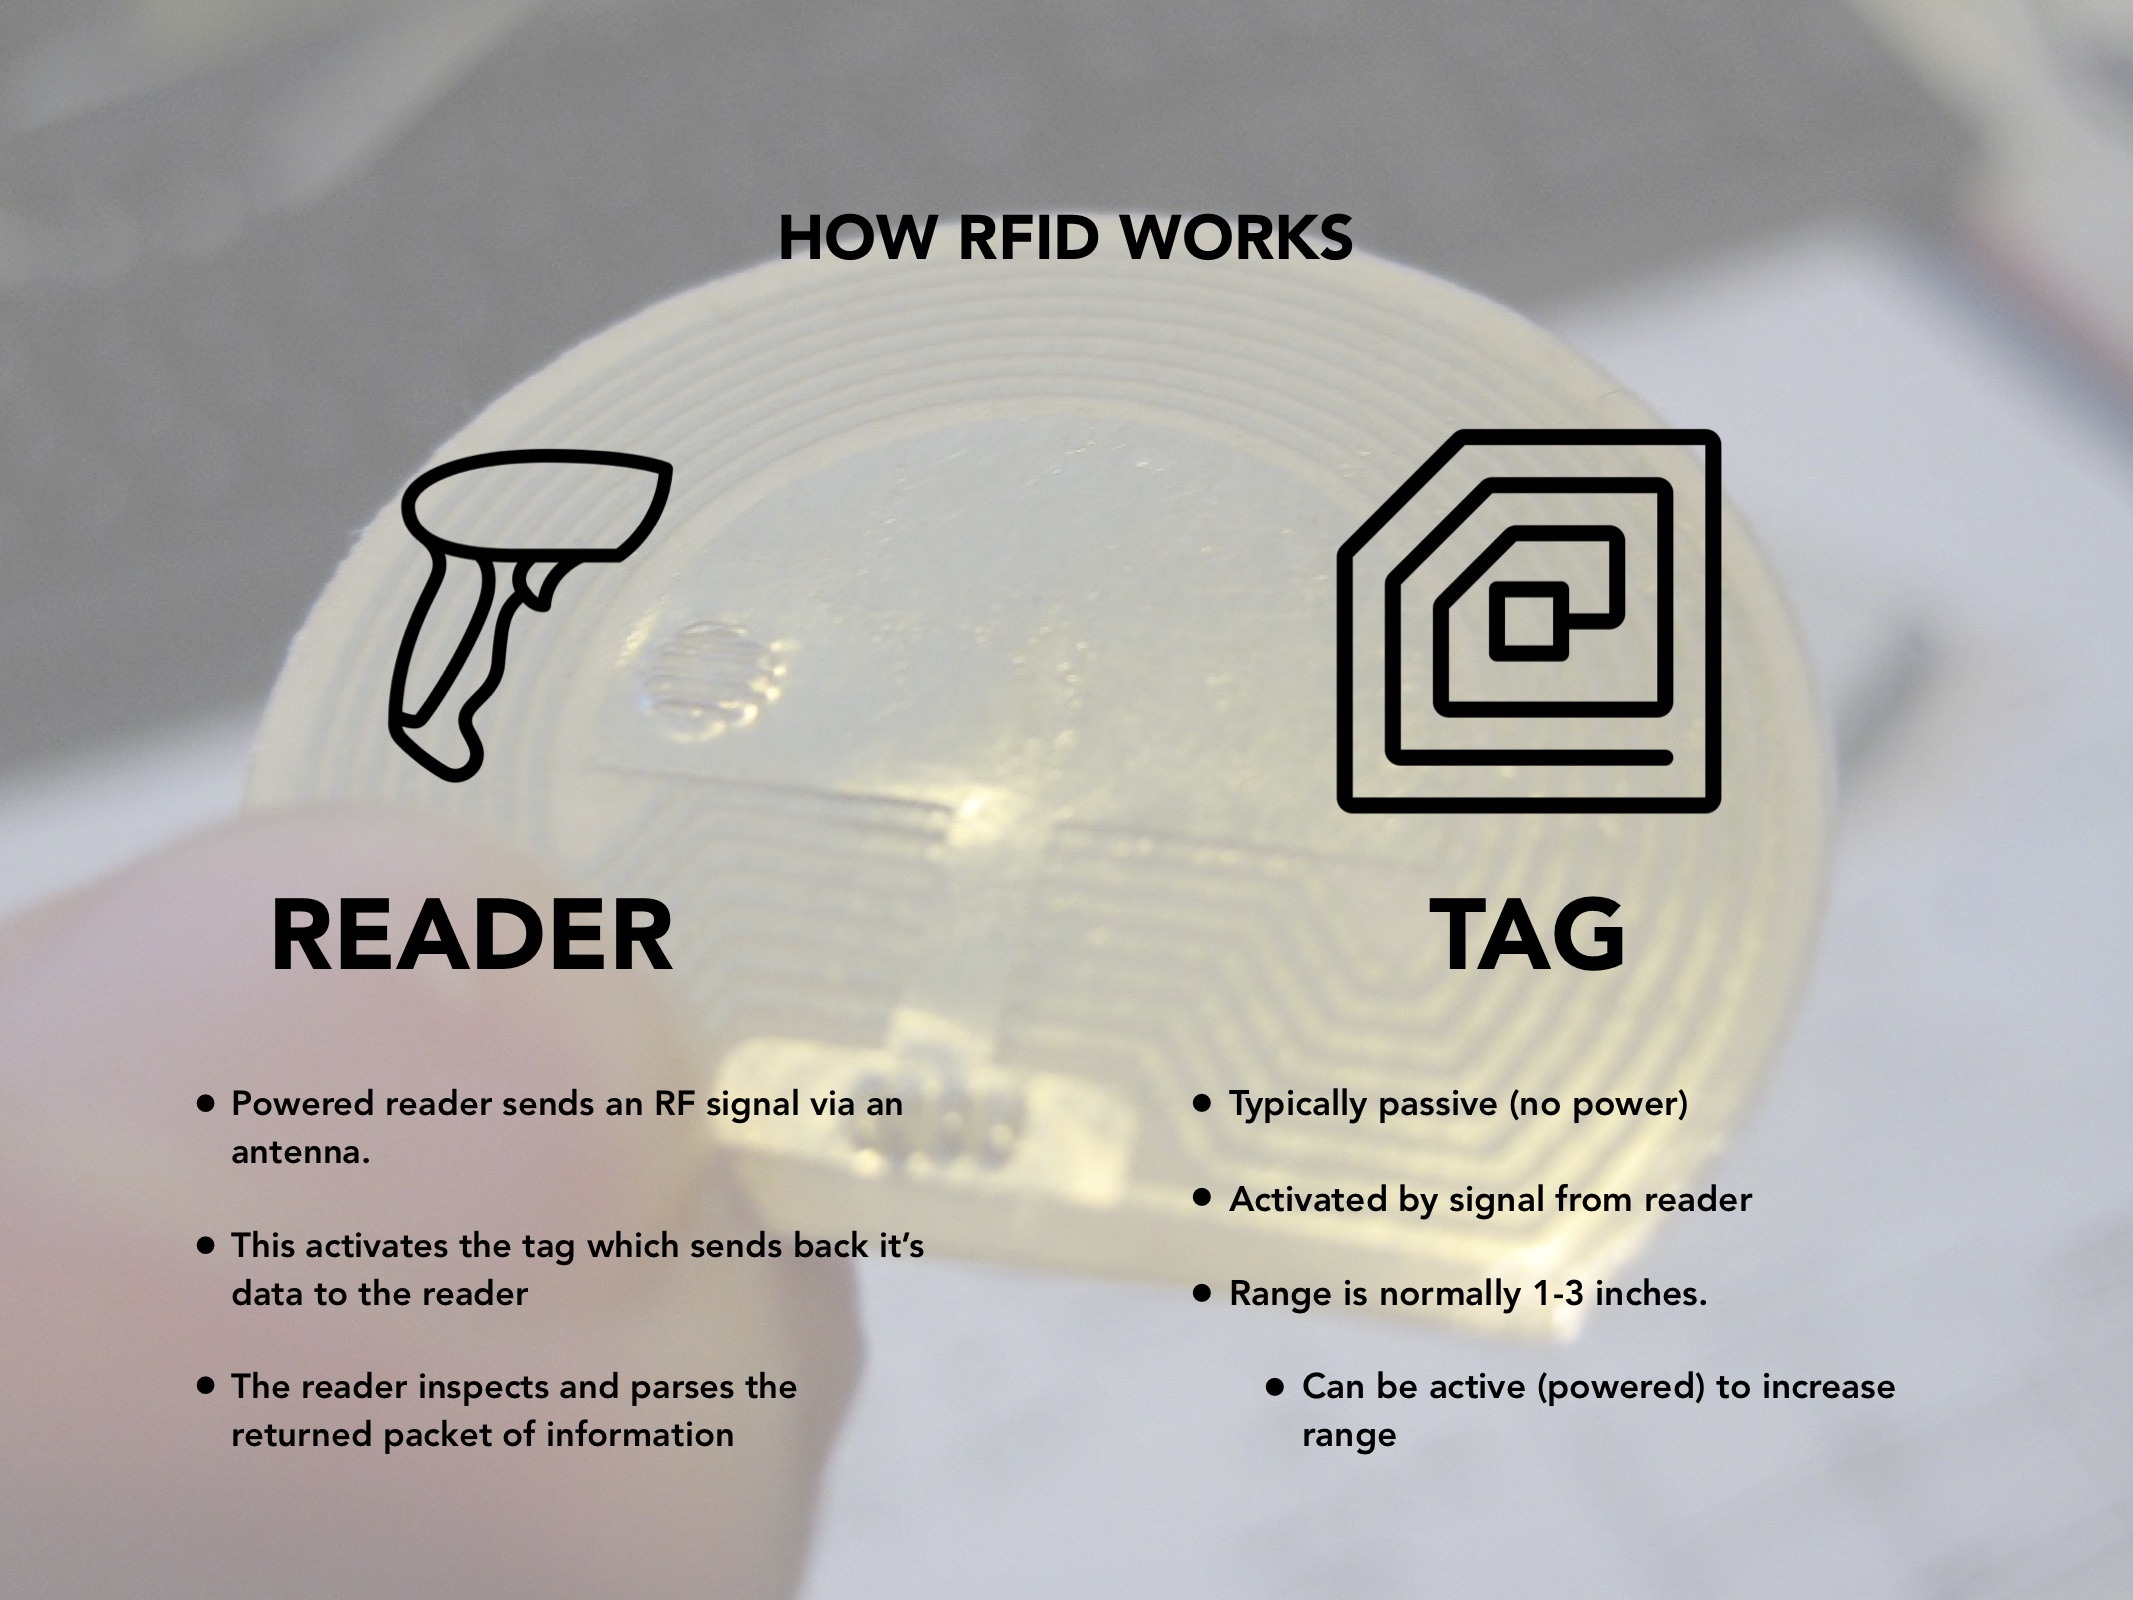
How Rfid Works
RFID, or Radio Frequency Identification, is a system that uses electromagnetic fields to identify, track and transfer data via tags attached to objects over short distances (typically less than 6 inches). The system consists of two devices: Reader and Tag (Information Holder). Each tag has a unique ID allowing information to be attached to an object and retrieved based on the association with that ID. In addition, some types of RFID allow for user programable memory.
Read more about RFID in this Sparkfun Guide: https://learn.sparkfun.com/tutorials/rfid-basics
Features
Benefits
- Only one of the two devices needs to be powered, while the other is a passive device.This allows for easy use in such things as credit cards, key fobs, and pet collars as there is no need to worry about battery life.
- Unlike a barcode, the tag need not be within the line of sight of the reader, so it may be embedded in the tracked object.
Limitations
- The reader and the information holder (ie credit card) must be very close
- Information Holder can only hold small amounts of data.
There are exceptions: an Ultra High Frequency RFID scanner can scan for tags (corresponding UHF) and scan at a range of meters instead of centimeters. They are awesome but a little scary. Applications using them need to make sure people “do not stand in the radiation beam of the antenna unless they are more than 21cm away from the face of the antenna (to adhere to FCC limits for long-term exposure).”

Frequences
Before you Begin
You’ll need a:
- Particle Microcontroller, RedBear Duo or RaspPi
- A USB Micro cable
- RC522 RFID Scanner (like this one)
- RFID Tag
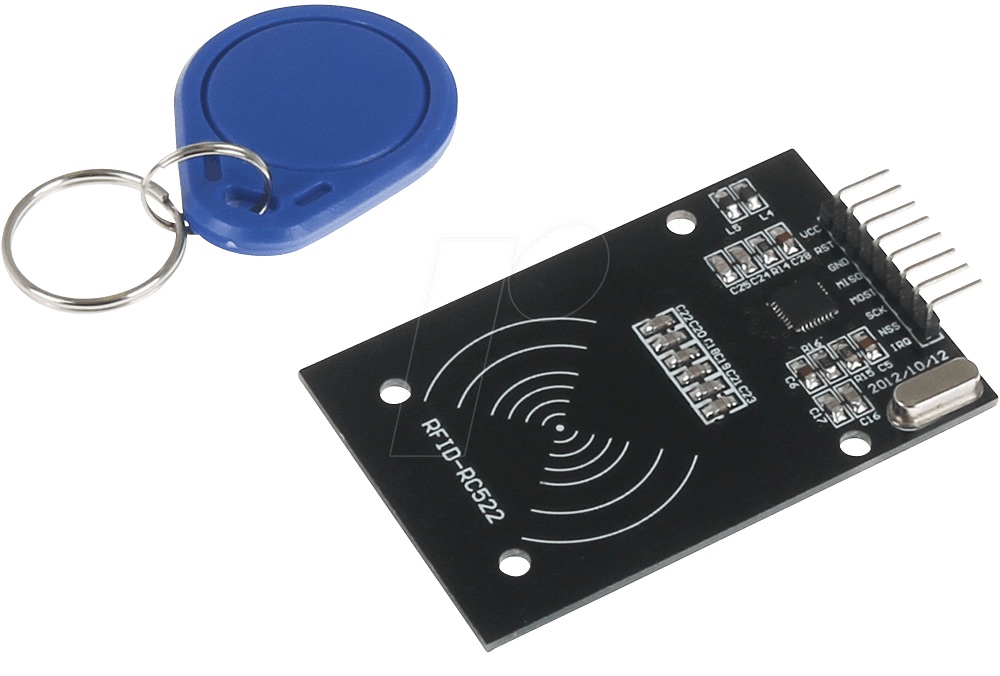
RC522
Working with the RC552
RC522
RFID is a Radio-frequency identification that uses electromagnetic fields to identify and track tags attached to objects. Depending on the type of RFID, it can communicate from 10cm up to 200m (microwave). For this project, we will use RC522 which have 13.56 MHz, which work from 50mm.
Datasheet can be found at: http://www.nxp.com/documents/data_sheet/MFRC522.pdf
Caution: This device is NOT a 5 volt powered device. You MUST power it with 3.3 volts. If you do not, you risk overheating the RFID.
Library for Particle: https://github.com/pkourany/MFRC522_RFID_Library
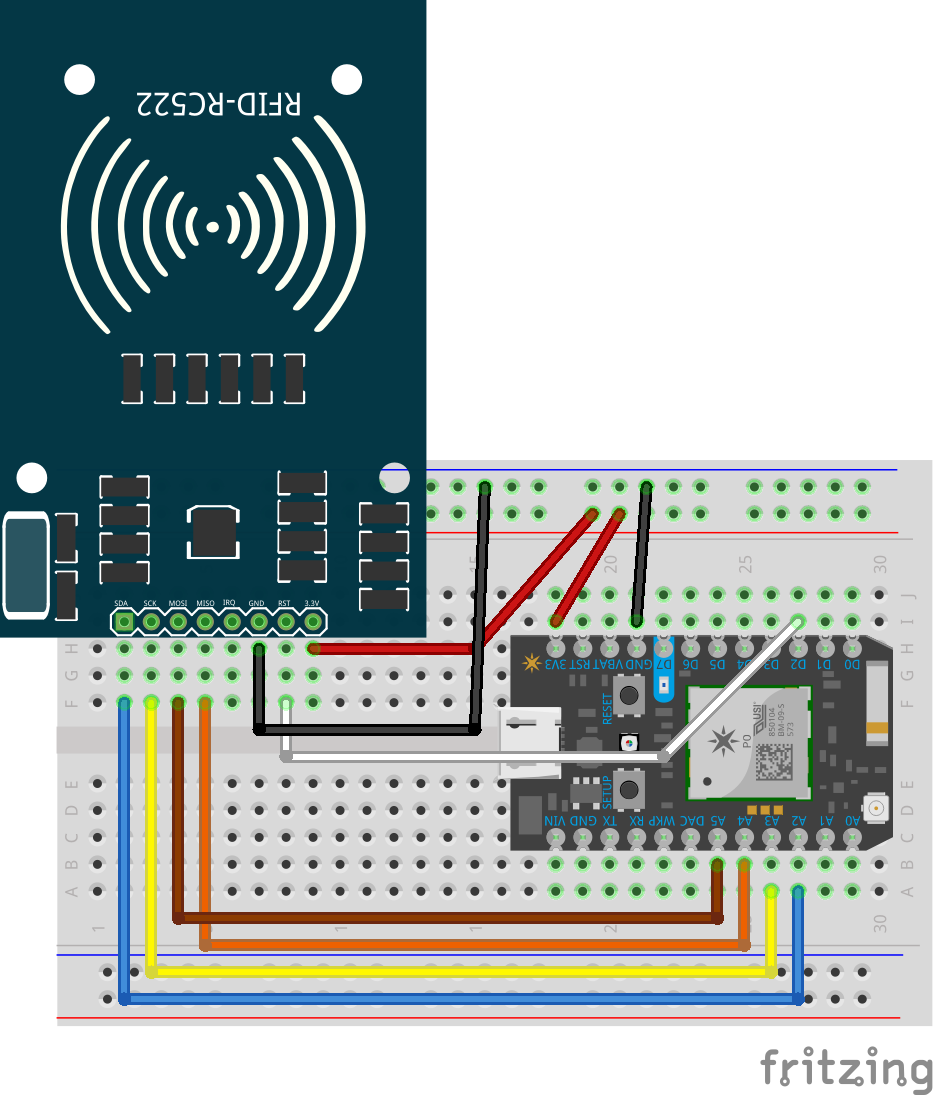
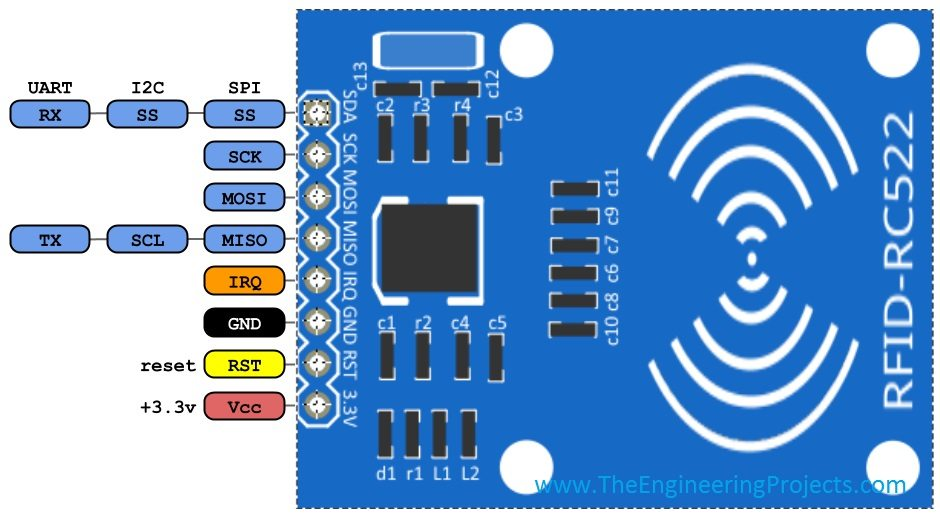
Wiring for RFID on Particle Photon
Wiring on a Photon or Duo
On a Particle Photon Pin layout should be as follows:
- MOSI: Pin A5
- MISO: Pin A4
- SCK : Pin A3
- SS/SDA : Pin A2 (Configurable)
- RST : Pin D2 (Configurable)
- GND : GND
- 3v3 : 3v3
Flashing the Code
Connect up your Particle device and make sure it connects to the interweb
Set up the Dev or Build environment to flash code to your intended device
Open Particle Dev (desktop) or Particle Build. Add the MFRC522_RFID_Library to your project
Paste in the following code to your project:
#include "MFRC522.h" //obtained from source mentioned above

#define SS_PIN SS
#define RST_PIN D2

MFRC522 mfrc522(SS_PIN, RST_PIN);	// Create MFRC522 instance.

void setup() {
	// Initialize serial communications with the computer
	Serial.begin(9600);
	mfrc522.setSPIConfig(); // sets up SPI config

	mfrc522.PCD_Init();	// Initialize RC522 card
	Serial.println("Start Scanning");
}

void loop() {
	// Look for new cards
	if ( ! mfrc522.PICC_IsNewCardPresent()) {
		return;
	}
	Serial.println("New card Detected")
	// Read tapped card data
	if ( ! mfrc522.PICC_ReadCardSerial()) {
		return;
	}

	//Dump all card data to Serial
	mfrc522.PICC_DumpToSerial(&(mfrc522.uid));
}
This code will allow you to to the basics of detecting an RFID chip.
Click on the Lighting icon (top left) to compile and send the code to your device via WiFi. Your device’s LED will turn magenta and the IDE.
In a few seconds, your device should begin scanning for nearby tags. To see the output, we can look at the serial monitor, and see what it’s outputting:
If you’re on Windows: Open a Command Prompt window If you’re on OSX: Open a Terminal Window
At the command prompt, type:
particle serial monitor
And you’ll see some output like:
Start Scanning
Great. Your particle device is scanning and finding lots of nearby devices.
Experiment by moving a tag into place and you should see the details of the tag appear
New card Detected
And some output like:
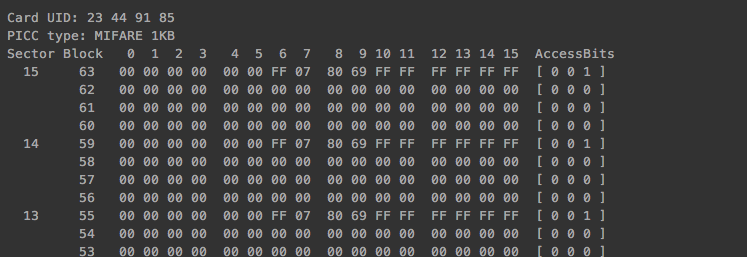
Console Output
Keep a note of the Tag ID and then you can adjust the code to perform whatever actions you’d like when the tag is detected or removed!
Additional examples can be found in the library here: https://github.com/pkourany/MFRC522_RFID_Library/tree/master/examples
Learn More
- RFID FAQs: http://www.rfidjournal.com/site/faqs
- Sparkfun Guide: https://learn.sparkfun.com/tutorials/rfid-basics
- MRFC 522 Library: https://github.com/pkourany/MFRC522_RFID_Library
- Additional Examples: https://github.com/pkourany/MFRC522_RFID_Library/tree/master/examples